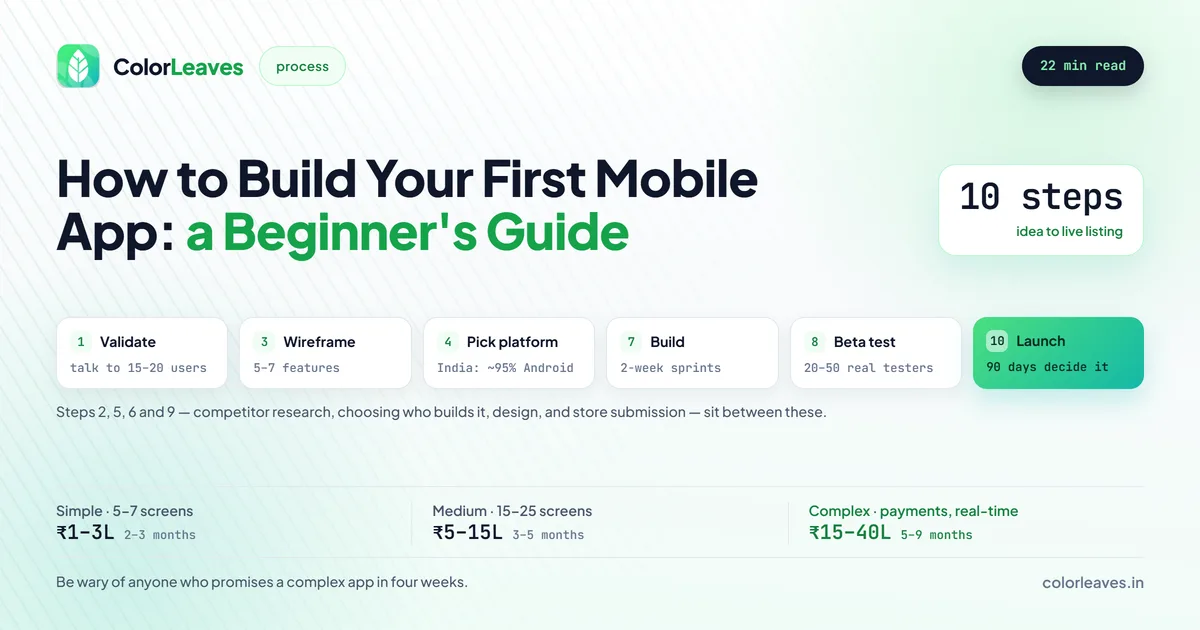
You have an app idea. Maybe it’s been sitting in a notebook for months, or maybe it hit you in the shower this morning. Either way, the gap between “great idea” and “live on the App Store” feels massive. This guide breaks that gap into 10 concrete steps so you know exactly what to do, and what to expect at each stage.
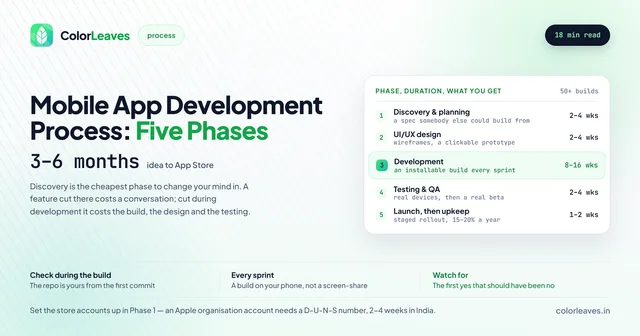
It’s written for somebody doing this for the first time. If you have commissioned software before and want the phase-by-phase version rather than the beginner’s, our walkthrough of the development process covers the same ground for a reader who already knows what a sprint is, and the timeline guide covers where the weeks go.
Key Takeaway: Building your first app takes 10 steps, from validating the idea and researching competitors to wireframing, development, testing, and launching on the app stores. Budget 3 to 6 months and several lakhs of rupees.
Step 1: Define Your App Idea and Validate It
Every successful app starts by solving a real problem. Not a problem you think exists, but one that actual people deal with regularly enough to download an app for it.
Start by answering three questions:
- What problem does this app solve? Be specific. “It helps people” is too vague. “It helps working parents in Pune find last-minute daycare options within 3km” is a real problem statement.
- Who has this problem? Define your target user. Age, location, habits, income level. The more specific you get, the better your app will be.
- How are they solving it right now? If the answer is “they’re not,” that could mean there’s no real demand. If the answer is “they use WhatsApp groups and Google Sheets,” you’ve found a gap worth filling.
How to Validate Before You Build
Validation doesn’t require code. Here’s what actually works:
- Talk to 15-20 potential users. Not friends and family who will tell you what you want to hear. Find strangers who fit your target profile. Ask them about the problem, not your solution.
- Create a simple landing page. Describe what your app will do and add a “Notify me when it launches” email signup. If nobody signs up, that tells you something.
- Check app store reviews. Search for apps that partially solve your problem. Read the 2-star and 3-star reviews. Those reveal what’s missing.
- Run a social media poll. Post in relevant Facebook groups, Reddit communities, or LinkedIn. Gauge interest and gather feedback.
The goal here isn’t to prove your idea is perfect. It’s to learn whether it’s worth investing 3-6 months and several lakhs of rupees into building.
Step 2: Research Your Market and Competitors
Even if your idea feels unique, similar apps almost certainly exist. That’s actually a good sign. It means there’s demand. Your job is to find what they’re doing wrong and do it better.
How to Conduct Competitor Research
- Search both Play Store and App Store using keywords your users would type. Download the top 5-10 results.
- Use each app for at least a week. Note what frustrates you, what delights you, and what’s missing entirely.
- Read their reviews systematically. Sort by “Most Recent” and read the last 50 reviews. Complaints cluster around specific features. Those are your opportunities.
- Check their update history. Frequent updates suggest an active team. No updates in 6+ months? That’s a competitor you can overtake.
- Study their monetization. How do they make money? Subscriptions, ads, in-app purchases, freemium? Understanding this helps you plan your own revenue model.
Document everything in a simple spreadsheet: app name, rating, downloads, top complaints, best features, pricing model. This becomes your competitive advantage map.
Step 3: Plan Features and Create Wireframes
Here’s where most first-time app builders make their biggest mistake: they try to build everything at once. Version 1 of your app should not have 47 features. It should have 5-7 features that work flawlessly.
Use the MoSCoW Method
Organize every feature idea into four buckets:
- Must Have: Features your app literally cannot function without. For a food delivery app, that’s browsing restaurants, placing orders, and making payments.
- Should Have: Important features that can wait for v1.1. Think order tracking or saved addresses.
- Could Have: Nice additions for later. Loyalty points, referral programs, social sharing.
- Won’t Have (for now): Features to consider for v2 or v3. AI recommendations, AR try-on, etc.
Your v1 launch should include only the Must Haves. Everything else goes into your product roadmap. We cover this prioritization process in more detail in our complete guide to the mobile app development process.
Creating Wireframes
Wireframes are simple sketches of each screen showing where elements go: no colors, no fancy graphics. Just layout and flow.
You can wireframe with:
- Pen and paper: Seriously, this works great for early ideas. Sketch each screen on a separate sheet and tape them to a wall.
- Figma: Free for individual use. Drag-and-drop interface. Industry standard.
- Balsamiq: Purpose-built for wireframing. Has a hand-drawn look that keeps stakeholders from fixating on visual design too early.
- Whimsical: Simple, fast, and collaborative.
Focus on the user flow first: what does the user see when they open the app? Where do they tap? What happens next? Map out the 3-4 most critical journeys before worrying about edge cases.
Step 4: Choose Your Platform (Android, iOS, or Both)
This decision affects your budget, timeline, and who can use your app. It’s not always obvious which platform to start with.
Quick Comparison
| Factor | Android | iOS |
|---|---|---|
| Market Share (India) | ~95% | ~5% |
| Global Market Share | ~72% | ~27% |
| Revenue Per User | Lower | 2-3x higher |
| Development Cost | ₹3-20 Lakhs | ₹4-25 Lakhs |
| Store Fee | $25 one-time | $99/year |
| Review Time | Hours to 2 days | 1-3 days |
| Device Fragmentation | High (1000s of devices) | Low (limited device range) |
If your target audience is in India, Android is usually the right first choice. If you’re targeting US, Europe, or premium users, iOS might make more sense. We’ve written a detailed Android vs iOS comparison that walks through this decision in depth.
The third option: build for both platforms simultaneously using a cross-platform framework like React Native or Flutter. This typically costs 30-40% less than building two separate native apps and gets you to market faster. See our cross-platform app development services if you’re exploring this route.
For platform-specific details, check our Android app development and iOS app development service pages. We also have a guide on how to choose the right mobile app development platform if you’re still weighing your options.
Step 5: Choose Your Development Approach
You’ve got three main paths to actually building the app. Each has real trade-offs.
| Approach | Cost | Timeline | Best For |
|---|---|---|---|
| DIY (No-Code/Low-Code) | ₹0-50,000 | 1-3 months | Very simple apps, prototypes, MVPs |
| Freelance Developer | ₹1-8 Lakhs | 2-5 months | Small apps with clear requirements |
| App Development Company | ₹5-40 Lakhs | 3-7 months | Complex apps, long-term products |
DIY with No-Code Tools
Platforms like Adalo, FlutterFlow, and Bubble let you build basic apps without writing code. They work for simple use cases: a company directory, event app, or basic marketplace. But you’ll hit limitations fast. Complex features, custom animations, and real-time functionality usually require actual development.
Hiring a Freelancer
Freelancers offer lower rates and direct communication. But you’re relying on a single person. If they get sick, take another project, or disappear mid-project (it happens more often than you’d think), you’re stuck. Freelancers also typically handle only development, meaning you’ll need to separately arrange design, testing, and project management.
Our guide to hiring app developers in Pune covers how to evaluate freelancers and avoid common pitfalls.
Working with a Development Company
A development company gives you a full team: project manager, designer, developers, and QA testers. You pay more, but you get structured processes, accountability, and a team that won’t disappear on you. For anything beyond a simple app, this is usually the most reliable path.
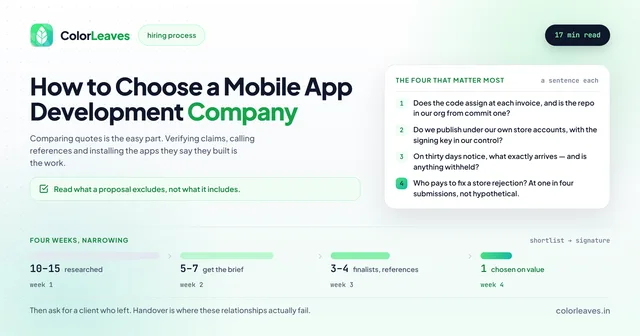
Not sure how to evaluate companies? Our guide on how to choose a mobile app development company covers the evaluation criteria, red flags to watch for, and questions to ask during the selection process. You can also browse our top mobile app development companies in Pune list for vetted options.
If you are outside India and considering a team here, the questions that matter shift toward contract terms and overlap hours rather than day rates, which our guide to hiring app developers in India covers alongside the risks worth knowing first. If you would rather direct the work yourself with a dedicated developer, that arrangement fits products still finding their shape better than a fixed scope does.
Whichever route you take, you can assess the people without being technical. Our interview questions for mobile developers are written for exactly that, and the trick is grading on specificity rather than correctness.
Step 6: Design the UI/UX
Design is not about making your app look pretty. It’s about making it so intuitive that users never have to think about how to do something. They just do it.
The Design Process
- User flow mapping: Diagram every path a user takes through your app. Every tap, every screen transition, every decision point.
- Low-fidelity wireframes: Quick sketches of screen layouts (you started this in Step 3). Now refine them based on the platform guidelines: Material Design for Android, Human Interface Guidelines for iOS.
- High-fidelity mockups: Add colors, typography, images, and real content. This is what your app will actually look like.
- Interactive prototype: Link your mockups into a clickable prototype using Figma or InVision. This lets you “use” the app before a single line of code is written.
- User testing: Put the prototype in front of 5-10 real users. Watch them try to complete key tasks. Where do they hesitate? Where do they tap the wrong thing? Fix those issues now, not after development.
If you want to get the design phase right, working with a team that specializes in mobile app UI/UX design can save you significant rework later. A well-designed prototype reduces confusion during development and leads to higher user satisfaction after launch.
Design Tips That Actually Matter
- Follow platform conventions. Android users expect a bottom navigation bar. iOS users expect swipe-to-go-back. Fighting platform norms frustrates users.
- Design for thumbs. Most people use their phones one-handed. Keep critical actions in the thumb-reachable zone (bottom half of the screen).
- Less is more. Every screen should have one primary action. If a user has to figure out what to do on a screen, you’ve put too much on it.
- Accessibility counts. Use sufficient color contrast, support dynamic font sizes, and add labels for screen readers. Around 15% of the world’s population has some form of disability.
Step 7: Develop the App
This is the longest phase. For a medium-complexity app, expect 8-16 weeks of active development. Here’s how the process should work if you’re doing it right.
Agile Development in Practice
Most professional teams use Agile methodology with 2-week sprints. Each sprint follows this cycle:
- Sprint Planning: The team picks features from the backlog to build in the next two weeks.
- Daily Standups: 15-minute check-ins where developers share progress and flag blockers.
- Development: Actual coding, building features one by one.
- Sprint Demo: At the end of each sprint, the team shows you what they built. You test it, give feedback, and adjust priorities for the next sprint.
- Sprint Retrospective: The team discusses what went well and what to improve.
This means you see working features every two weeks, not a finished app after four months of silence. If something’s going in the wrong direction, you catch it early.
Technology Stack Decisions
Your development team will recommend a tech stack based on your requirements. Common choices in 2026:
Native Android: Kotlin, Jetpack Compose, MVVM architecture Native iOS: Swift, SwiftUI, Combine Cross-Platform: Flutter (Dart) or React Native (JavaScript/TypeScript)
If you’re weighing Flutter vs React Native, we’ve written a detailed comparison of both frameworks covering performance, developer availability, and cost differences.
Backend: Node.js, Python (Django/FastAPI), or Firebase for simpler apps Database: PostgreSQL, MongoDB, or Firestore Cloud: AWS, Google Cloud, or Azure
What You Should Expect During Development
- Regular builds to test on your own device
- A project management tool (Jira, Asana, or Trello) where you can track progress
- Weekly or bi-weekly calls with your project manager
- Clear documentation of what’s been built and what’s pending
If your development partner goes quiet for weeks at a time, that’s a problem. Good communication during development is non-negotiable.
Step 8: Test Thoroughly
Testing isn’t something that happens at the end. It should run alongside development. But before you launch, you need a final, thorough testing phase.
Types of Testing Your App Needs
- Functional Testing: Does every feature work as expected? Tap every button, fill every form, test every flow.
- UI Testing: Does the design match the mockups? Are elements aligned? Do animations run smoothly?
- Performance Testing: How fast does the app load? How much memory does it use? Does it drain the battery?
- Security Testing: Is user data encrypted? Are APIs secure? Can someone intercept sensitive information?
- Compatibility Testing: Test on at least 10-15 real devices covering different screen sizes, OS versions, and manufacturers. Emulators catch some issues, but real devices catch more.
- Edge Case Testing: What happens when the user has no internet? What if they rotate the screen mid-transaction? What if they get a phone call while submitting a form?
Compatibility testing deserves more than a bullet if your users are Indian, because the failures that generate one star reviews are not screen sizes. They are manufacturer battery managers on Xiaomi and Oppo devices killing background work within minutes, and memory ceilings on 3GB hardware that no emulator reproduces. Our piece on Android device fragmentation covers choosing five or six devices deliberately, which does more than fifteen chosen at random, and covers what the Play Console already tells you for free.
Beta Testing with Real Users
Before your public launch, release a beta version to a small group of real users:
- Android: Use Google Play Console’s internal testing or closed testing tracks
- iOS: Use TestFlight to invite up to 10,000 beta testers
Aim for 20-50 beta testers. Give them specific tasks to complete and a simple way to report issues (a Google Form works fine). Fix critical bugs before going public.
Twenty engaged testers who match your real audience beat two hundred volunteers, and the difference is almost entirely in how you brief them. Our guide to running a beta on TestFlight and Play internal tracks covers getting feedback worth acting on rather than a handful of “looks good” messages. It also covers a benefit people miss: TestFlight builds go through a lighter version of App Review, so an obvious guideline problem surfaces days before it can cost you a submission cycle.
One planning note for Android. A brand new personal Play developer account must run a closed test with at least 12 testers for 14 consecutive days before it can publish publicly, so start collecting tester emails while the app is still in QA. Our Play Console guide covers the rule and the rest of the account setup.
Step 9: Launch on the App Stores
Submitting your app to the Play Store and App Store involves more than uploading a file. Both stores have requirements you need to prepare for.
Google Play Store Submission
- Developer account: $25 one-time fee
- Store listing: Title, short description (80 chars), full description (4,000 chars)
- Screenshots: At least 2 screenshots per device type (phone, tablet)
- Feature graphic: 1024 x 500 pixels
- Privacy policy: Required. Host it on your website
- Content rating: Complete the IARC questionnaire
- Review time: Usually within hours, sometimes 1-2 days
Apple App Store Submission
- Developer account: $99/year
- App Store Connect: Fill in all metadata
- Screenshots: Required for all supported device sizes
- App Preview video: Optional but recommended
- Privacy details: Declare all data collection practices
- Review time: 1-3 days on average, sometimes longer for first submissions
Set both accounts up in week one rather than at this step. An Apple organisation account needs a D-U-N-S number that takes two to four weeks to obtain in India, which our Apple Developer account guide covers, and the publishing cost breakdown covers the full fee picture on both stores. Started alongside development, these cost nothing. Started here, they add weeks.
Budget a review cycle rather than a review. Apple rejects roughly one in four submissions, and the most common reason for a first-time publisher is guideline 4.2, minimum functionality, which catches anything that reads as a wrapper around a website. Our guide to why apps get rejected covers the pre-submission checks that catch most of it, and about two thirds of rejections are things nobody checked rather than judgement calls.
One thing to settle before you submit anything: both accounts should be registered to your company rather than to whoever built the app. Published under a developer’s account, the listing, the ratings history and the right to ship an update belong to them. Our guide to who owns your code covers this alongside the repository, and the contract checklist covers the clause that prevents it.
App Store Optimization (ASO) Basics
Think of ASO as SEO for app stores. Get these right at launch:
- Title: Include your primary keyword naturally. “QuickPark: Find Parking in Pune” is better than just “QuickPark.”
- Keywords (iOS): You get 100 characters. Use them wisely: no spaces after commas, no repetition.
- Description: Front-load the first 2-3 lines with your most compelling value proposition. Most people won’t tap “Read More.”
- Screenshots: Your first two screenshots are the most important. Show the app’s core value, not the splash screen.
- Ratings and reviews: Ask happy users for reviews, but don’t be spammy about it. Timing matters. Ask after a positive action (order completed, goal achieved), not on first launch.
Step 10: Market and Maintain Your App
Launching is not the finish line. Most apps gain traction (or die) in the 90 days after launch. You need a plan for both marketing and maintenance.
Post-Launch Marketing
- Social media announcements: Post on all your channels. Share behind-the-scenes content about the development journey.
- Press outreach: Contact tech blogs, local media, and industry publications. A short, well-written press release goes further than you’d think.
- Content marketing: Write blog posts about the problem your app solves. Useful content drives organic downloads.
- Influencer partnerships: Find micro-influencers (5K-50K followers) in your niche. They’re affordable and their audiences are engaged.
- Paid acquisition: Google Ads (Universal App Campaigns) and Meta Ads can drive installs, but set a daily budget cap and track cost-per-install carefully.
Analytics to Track From Day One
Install Firebase Analytics or a similar tool and monitor:
- Daily/Monthly Active Users (DAU/MAU): Are people actually using the app?
- Retention rate: What percentage of users return after 1 day, 7 days, 30 days? A good Day 7 retention for most apps is 15-25%.
- Session length: How long do people spend in the app?
- Conversion funnel: Where do users drop off?
- Crash reports: Fix crashes immediately. A crashing app gets uninstalled and gets bad reviews.
Ongoing Maintenance
Budget for ongoing maintenance, typically 15-20% of your initial development cost per year. This covers:
- Bug fixes and crash resolution
- OS update compatibility (new iOS and Android versions release annually)
- Security patches
- Performance optimization
- Minor feature improvements based on user feedback
If you want to learn more about what maintenance involves and how to budget for it, our app maintenance cost guide breaks the figure down properly, and a defined support arrangement agreed before launch costs less than one negotiated during an incident.
Two of those bullets are hard deadlines rather than good practice. Google raises the target API level requirement every year, and apps that miss it stop reaching new users on current devices. And the Apple Developer membership renews annually, so if the payment fails your apps come off the App Store until you pay. Both apply whether or not you have shipped a feature that year.
If you built a deliberately small first version, our MVP costing guide covers how to decide what happens next, which is the decision this whole process was set up to reach.
How Much Does All This Cost?
Here’s a realistic cost breakdown for building a mobile app in India in 2026:
| App Type | Cost Range (INR) | Timeline |
|---|---|---|
| Simple app (5-7 screens, basic features) | ₹1-3 Lakhs | 2-3 months |
| Medium app (15-25 screens, API integrations, user accounts) | ₹5-15 Lakhs | 3-5 months |
| Complex app (real-time features, payments, admin panel) | ₹15-40 Lakhs | 5-9 months |
These ranges include design, development, testing, and launch. They don’t include ongoing maintenance, marketing, or server costs.
They also don’t include the cost specific to your category, which for several kinds of app is larger than any feature line. An education product needs content, where a question bank and studio video routinely exceed the app itself. A property marketplace needs listings. An on-demand product carries per-ride mapping and SMS costs that scale with success. Work out your recurring cost per user or per transaction before you set pricing.
For a much more detailed breakdown by app type and feature, check our complete guide to app development costs in India, and what it costs to hire developers if you would rather staff a team than buy a build. If you are comparing quotes from different cities, the Pune, Bangalore and Mumbai comparison explains what the Tier-1 premium actually buys, which is mostly rent and salary rather than capability.
How Long Will It Take?
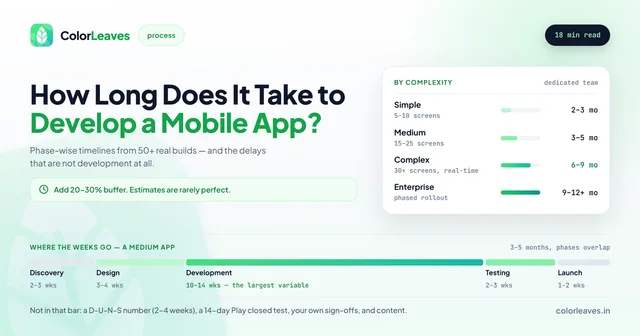
Timelines vary widely, but here’s what’s realistic:
| Phase | Simple App | Medium App | Complex App |
|---|---|---|---|
| Planning & Validation | 1-2 weeks | 2-3 weeks | 3-4 weeks |
| Design | 1-2 weeks | 2-4 weeks | 4-6 weeks |
| Development | 4-6 weeks | 8-12 weeks | 12-20 weeks |
| Testing | 1-2 weeks | 2-3 weeks | 3-4 weeks |
| Launch | 1 week | 1-2 weeks | 1-2 weeks |
| Total | 2-3 months | 4-6 months | 6-9 months |
Be wary of anyone who promises a complex app in 4 weeks. Quality takes time. Our mobile app development timeline guide has more detailed breakdowns by project type.
Frequently Asked Questions
How much does it cost to build a mobile app?
In India, a simple app costs ₹1-3 Lakhs, a medium-complexity app costs ₹5-15 Lakhs, and a complex app with advanced features costs ₹15-40 Lakhs or more. The final cost depends on the platform, number of features, backend complexity, and third-party integrations. Read our detailed cost breakdown for specifics.
Can I build an app with no coding experience?
Yes, to a point. No-code platforms like Adalo, FlutterFlow, and Bubble let you build basic apps without writing code. They work for simple use cases: internal tools, event apps, basic marketplaces. But if your app needs custom functionality, real-time features, or complex integrations, you’ll eventually need professional developers.
How long does it take to build an app?
A simple app takes 2-3 months, a medium-complexity app takes 4-6 months, and a complex app takes 6-9 months. These timelines include planning, design, development, testing, and launch. Rushing the process typically leads to a poor-quality app that needs to be rebuilt anyway.
Should I build for Android or iOS first?
If your target market is India, start with Android. It has roughly 95% market share here. If you’re targeting the US, Europe, or premium user segments, iOS might make more sense. Cross-platform frameworks like Flutter and React Native let you build for both simultaneously at a lower cost than two native apps. See our full platform comparison for a deeper analysis.
Is it better to hire a freelancer or an app development company?
Freelancers work well for small, clearly defined projects with budgets under ₹3-4 Lakhs. For anything more complex, a development company is usually the better choice: you get a full team (designer, developers, QA), structured processes, and accountability. The risk of a freelancer disappearing mid-project or delivering inconsistent quality is real. Our hiring guide covers this decision in detail.
What makes an app successful?
Three things separate successful apps from the rest: they solve a genuine problem, they’re simple to use, and they keep improving after launch. Most failed apps either solve a problem nobody has, make users think too hard, or launch and never update. Pair a validated idea with solid execution and consistent post-launch iteration, and you have the foundation for success.
Ready to Build Your App?
If this guide made you more excited than overwhelmed, you’re ready to start. And if the technical side feels like a lot to take on, that’s what we’re here for.
At Color Leaves, we’ve helped businesses and startups in Pune turn app ideas into live products for over 10 years. We handle everything from initial planning and design through development, testing, and App Store launch. You bring the idea and the domain expertise; we bring the technical team and the process.
Check out our portfolio to see what we’ve built, or get in touch with us for a free consultation. We’ll review your idea, give you an honest assessment, and outline what it would take to build it.